Basics
The core functionality of pysat is exposed through the
pysat.Instrument object. The intent of the Instrument
object is to offer a single interface for interacting with science data that is
independent of measurement platform. The layer of abstraction presented by the
Instrument object allows for things to occur in the background that
can make science data analysis simpler and more rigorous.
To begin,
import pysat
The data directory paths pysat looks in for data needs to be set upon the first import,
# Set a single directory to store all data
pysat.params['data_dirs'] = path

# Alternately, multiple paths may be registered.
pysat.params['data_dirs'] = [path_1, path_2, ..., path_n]
More than one directory may be assigned by supplying a list of strings.
When looking for data for a given pysat.Instrument, pysat will
start with the first directory and iterate through the list until one is found.
Only one directory with data is supported per Instrument.
If no data is found in any of the listed directories then pysat will by
default assign the first path in pysat.params['data_dirs'].
Note
A data directory must be set before any pysat.Instrument
may be used or an error will be raised.
Instrument Discovery
Support for each instrument in pysat is enabled by a suite of methods that interact with the particular files for that dataset and supply the data within in a pysat compatible format. A particular data set is identified using up to four parameters
Identifier |
Description |
platform |
Name of the platform supporting the instrument |
name |
Name of the instrument |
tag |
Label for an instrument data product |
inst_id |
Label for instrument sub-group |
In pysat v3.x+, Instrument modules are supported by separate
instrument packages. Local instruments in pysat.instruments
sub-module have been developed for testing purposes. The current list and
development status of different packages in the pysat ecosystem can be found on
the wiki.
You can learn about the different Instruments in an instrument package using
the utility pysat.utils.display_available_instruments(). When
providing an Instrument sub-module as input, this will list
the Instrument module name, all possible combinations of the
tag and inst_id attributes, and a description of the data
(if available). This example will use the pysatMadrigal package.
import pysat
import pysatMadrigal as pysatMad
pysat.utils.display_available_instruments(pysatMad.instruments)
You can see each listed instrument supports one or more data sets for analysis.
The sub-modules are named with the convention platform_name. When supplying
an Instrument sub-module as input the display utility
provides the sub-module name instead of the platform and
name because non-registered Instruments are instantiated using the
inst_module keyword instead of the platform and
name keywords (jump to the Instantiation section below for
more information). To use the platform and name keywords,
the instrument must be registered. To display the registered instruments, no
input is needed. To register a group of instruments within a module,
follow the example below.
import pysat
import pysatMadrigal as pysatMad
pysat.utils.registry.register_by_module(pysatMad.instruments)
You may also register a more select group of instruments.
import pysat
pysat.utils.registry.register(['pysatMadrigal.instruments.dmsp_ivm',
                               'pysatMadrigal.instruments.jro_isr'])
See pysat.utils.registry for more details. To display the registered
instruments, no input is needed.
pysat.utils.display_available_instruments()
Regardless of the Instantiation method, the help() function can
use the inst_module as input to access the built-in
documentation for the Instrument sub-module in an interactive
environment. Using help() on the instantiated
Instrument will return the documentation for the general
Instrument class.
Standard Workflow
The standard pysat workflow takes place by interacting primarily with pysat and
not the Instrument sub-modules. Exceptions to this rule occur when
invoking custom Instrument analysis methods (typically found in
inst_package.instruments.methods() for an arbitrary pysat ecosystem
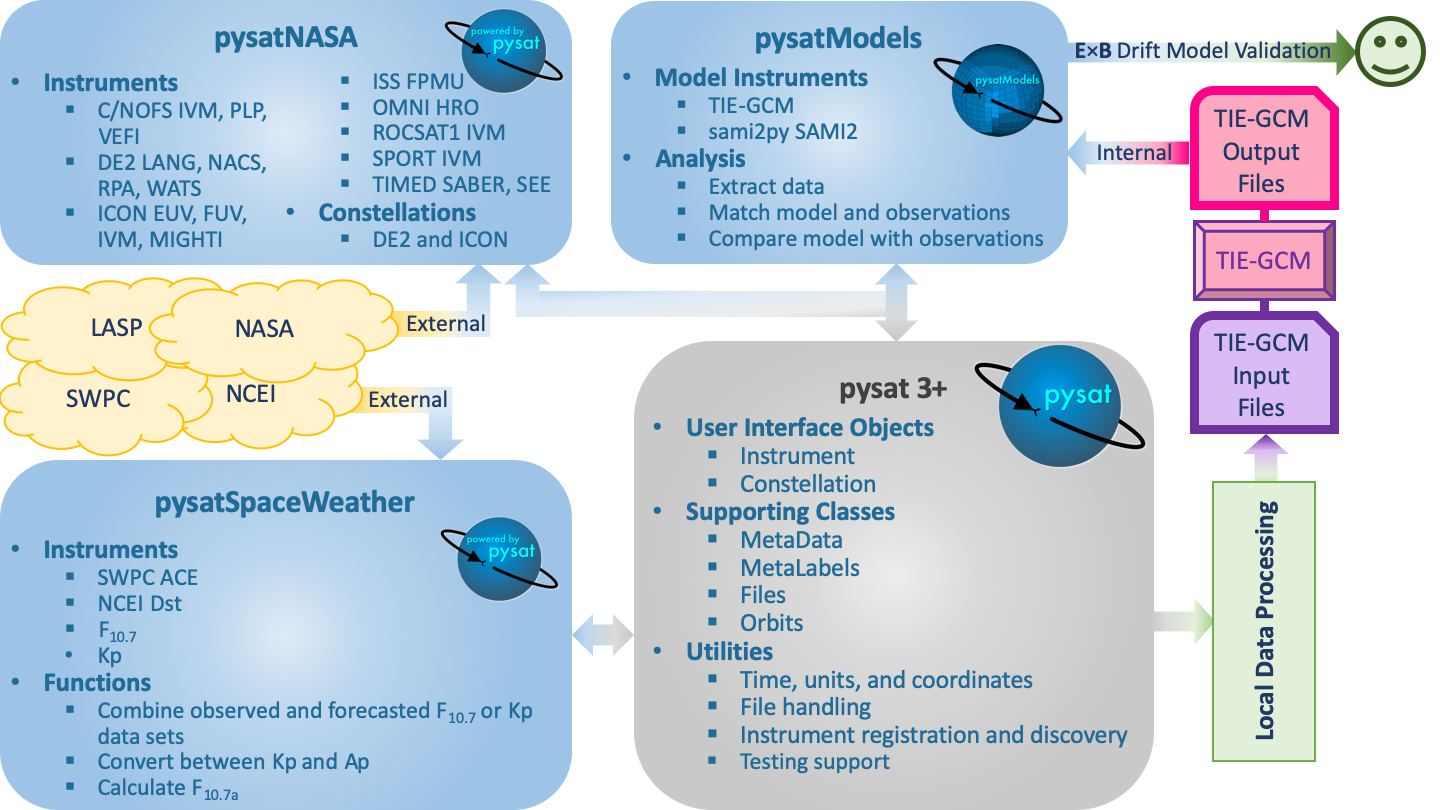
package) or when using specific package utilites. The figure below shows a
sample workflow, where local routines use pysatSpaceWeather through
pysat to create an input file with appropriate space weather inputs for TIE-GCM.
Then, the utilities in pysatModels are used within different local
routines to validate the TIE-GCM ionosphere using the C/NOFS IVM E x B
drifts. This figure also demonstrates how pysat Instrument
sub-modules can be used to retrieve both external and internal data sets.
Simple Workflow
A simpler example, that presents a pysat workflow involving retrieving and
loading data from a single Instrument, is presented below.
Instantiation
To create a pysat.Instrument object, select a platform
and instrument name or an inst_module along side
(potentially) a tag and inst_id, consistent with the
desired data from a supported instrument.
For example, if you wanted to work with plasma data from the Ion Velocity Meter (IVM) onboard the Defense Meteorological Satellite Program (DMSP) constellation, (specifically, the F12 spacecraft), use:
import pysatMadrigal as pysatMad
dmsp = pysat.Instrument(inst_module=pysatMad.instruments.dmsp_ivm,
                        tag='utd', inst_id='f12')
Behind the scenes pysat uses a python module, dmsp_ivm, that
understands how to interact with 'utd' data for 'f12'.
If you have previously registered the instruments in pysatMadrigal,
you can specify the desired Instrument using the platform
and name keywords.
dmsp = pysat.Instrument(platform='dmsp', name='ivm', tag='utd',
                        inst_id='f12')
You can also specify the specific keyword arguements needed for the standard
pysat methods. DMSP data is hosted by the Madrigal database, a community resource for
geospace data. The proper process for downloading DMSP and other Madrigal data
is built into the open source tool
madrigalWeb,
which is invoked appropriately by pysat within the
pysatMadrigal.instruments.dmsp_ivm sub-module. Madrigal requires that
users provide their name and email address as their username and password.
# Set user and password for Madrigal
username = 'Firstname+Lastname'
password = 'email@address.com'

# Initialize the instrument, passing the username and password to the
# standard routines that need it
dmsp = pysat.Instrument(platform='dmsp', name='ivm', tag='utd',
                        inst_id='f12', user=username, password=password)
Download
Let’s download some data. To get DMSP data specifically all we have to do is
invoke the download() method attached to the DMSP
Instrument object. If the username and password have’t been provided
to the Instrument already, be sure to include them here.
import datetime as dt

# Define date range to download data
start = dt.datetime(2001, 1, 1)
stop = dt.datetime(2001, 1, 2)

# Download data, assuming username and password were not set
dmsp.download(start, stop, user=username, password=password)
The specific location the data is downloaded to depends upon user settings.
By default, pysat data directories are organized via
os.path.join(top_level, platform, name, tag, inst_id), where the top-level
is one of the directories in pysat.params['data_dirs']. The specific
structure for your system is stored in pysat.params['directory_format'].
Presuming defaults, this example downloads DMSP data to
os.path.join(top_level, dmsp, ivm, utd, f12). If this is the first download,
then the first of the pysat data directories will be used by default. If there
was already DMSP data on your system under one of the
pysat.params['data_dirs'], then the same top-level directory as existing
DMSP data will be used. To pick a different directory to download data to, use
dmsp.files.set_top_level_directory(new_path)
At the end of the download, pysat will update the list of files associated with DMSP. Note that having multiple directories with data may lead to unexpected results.
Some instruments support an improved download experience that ensures the local system is fully up to date compared to the data source. The command,
dmsp.download_updated_files()
will obtain the full set of files present on the server and compare the version, revision, and cycle numbers for the server files with those on the local system. Any files missing or out of date on the local system are downloaded from the server. This command downloads, as needed, the entire dataset.
Instruments that don’t have a pysat.Instrument.remote_file_list()
method can still use this method, but with less clever updating functionality.
Because remote file information cannot be obtained, it will assume there should
be a file for every day and only attempt to download files for the days where
files are missing.
Note
Science data servers may not have the same reliability and bandwidth as commercial providers
Load Data
Data is loaded into a pysat.Instrument object, in this case
dmsp, using the load() method using year and day of year, date, or
filename.
# Load by year, day of year
dmsp.load(2001, 1)

# Load by date
dmsp.load(date=start)

# Load by filename from string
dmsp.load(fname='dms_ut_20010101_12.002.hdf5')
When the pysat Instrument.load() method runs it stores the
Instrument data into
# Instrument data
dmsp.data
This configuration provides full access to the underlying data library functionality. For additional details on loading a range of dates as well as support for both pandas and xarray as the underlying data structure, see Data Loading.
Data Access
After loading data, the next thing you probably want to do is use it! pysat
supports standard pandas or xarray access through the
pysat.Instrument.data object, but also provides convenient access to
the data at the pysat.Instrument level that behaves the same whether
data is a pandas.DataFrame or a
xarray.Dataset object.
# Convenient data access
dmsp['ti']

# Slicing data by indices
dmsp[0:10, 'ti']

# Slicing by date and time
dmsp[start:stop, 'ti']

# Convenient data assignment
dmsp['ti'] = new_array

# Data broadcasting assignment for new variables, sets a single value to all times
dmsp['ti'] = single_value

# Assignment through index slicing
dmsp[0:10, 'ti'] = sub_array

# Assignment through datetime slicing
dmsp[start:stop, 'ti'] = sub_array
Note that np.where() may be used to select a subset of data using
either the convenient access or standard pandas or xarray selection methods.
idx, = np.where((dmsp['mlat'] < 5) & (dmsp['mlat'] > -5))
dmsp.data = dmsp[idx]
# Alternatively
dmsp.data = dmsp.data.iloc[idx]
is equivalent to
dmsp.data = vefi[(dmsp['mlat'] < 5) & (dmsp['mlat'] > -5)]
See the Instrument section for more information.
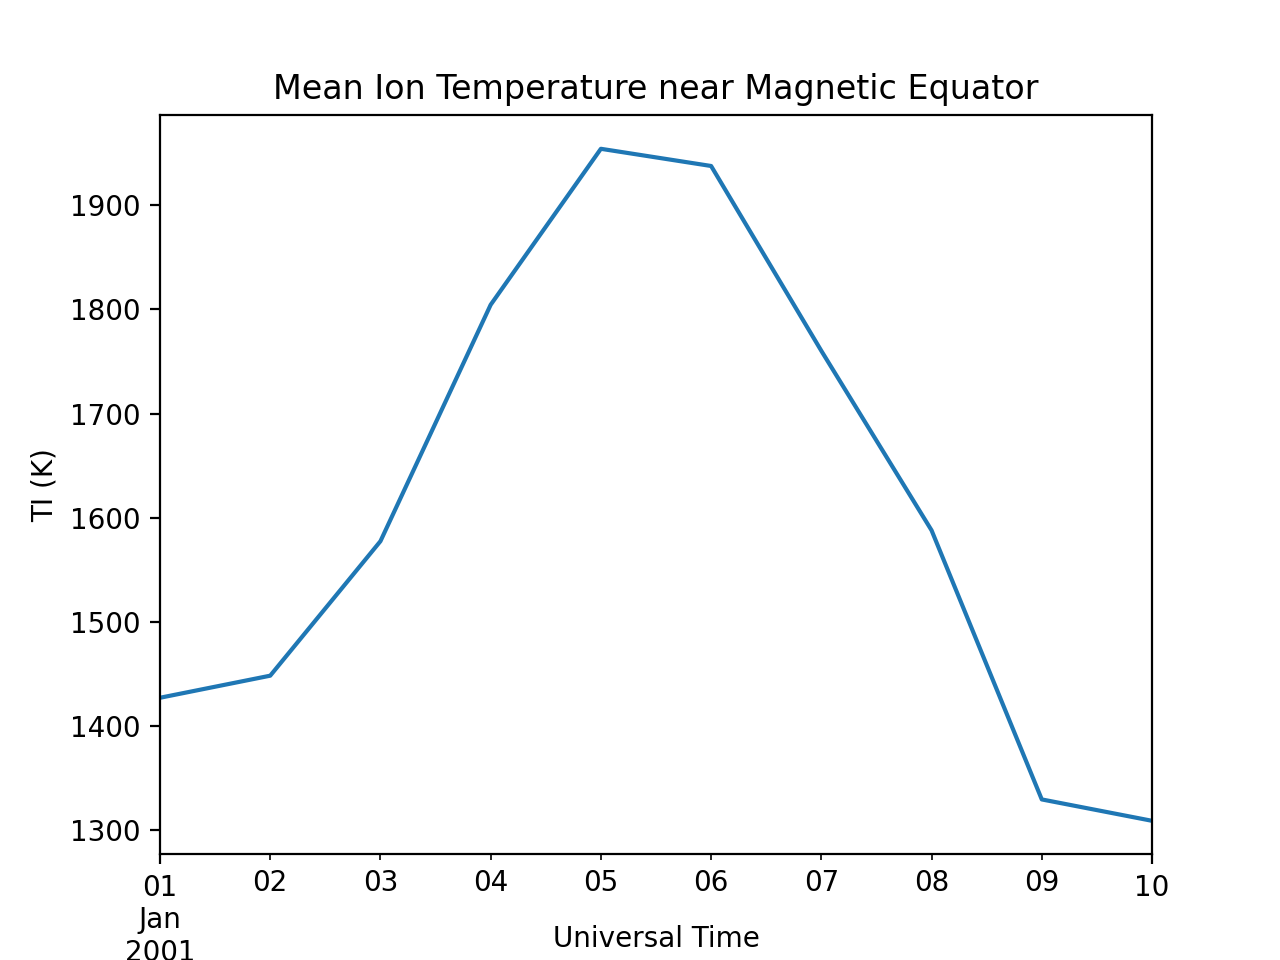
Simple Analysis Example
Here we present an example, following from the simple workflow above, where we
plot DMSP ion temperature data over a season. pysat provides a function,
pysat.utils.time.create_date_range(), that returns an array of dates
over a season. This time period does not need to be continuous (e.g., load both
the vernal and autumnal equinoxes).
import matplotlib.pyplot as plt
import numpy as np
import pandas as pds

# Create empty series to hold result
mean_ti = pds.Series()

# Get list of dates between start and stop
start = dt.datetime(2001, 1, 1)
stop = dt.datetime(2001, 1, 10)
dmsp.download(start=start, stop=stop, user=username, password=password)
date_array = pysat.utils.time.create_date_range(start, stop)

# Iterate over season, calculate the mean Ion Temperature
for date in date_array:
   # Load data into dmsp.data
   dmsp.load(date=date)
   # Check if data present
   if not dmsp.empty:
       # Isolate data to locations near geomagnetic equator
       idx, = np.where((dmsp['mlat'] < 5) & (dmsp['mlat'] > -5))

       # Downselect data
       dmsp.data = dmsp[idx]

       # Compute mean ion temperature using pandas functions and store
       mean_ti[dmsp.date] = dmsp['ti'].abs().mean(skipna=True)

# Plot the result using pandas functionality for a simple figure
mean_ti.plot(title='Mean Ion Temperature near Magnetic Equator')

# Improve figure using matplotlib tools
plt.ylabel(dmsp.meta['ti', dmsp.meta.labels.name] + ' (' +
           dmsp.meta['ti', dmsp.meta.labels.units] + ')')
plt.xlabel("Universal Time", labelpad=-15)
Metadata
The example aboved used metadata to provide the y-axis label name and units. Metadata is also stored in a Meta object from the main science data. pysat presumes a minimum default set of metadata that may be arbitrarily expanded. The default parameters are driven by the attributes required by public science data files, like those produced by the Ionospheric Connections Explorer (ICON).
Metadata |
Description |
axis |
Label for plot axes |
desc |
Description of variable |
fill |
Fill value for bad data points |
label |
Label used for plots |
name |
Name of variable, or long_name |
notes |
Notes about variable |
max |
Maximum valid value |
min |
Minimum valid value |
units |
Variable units |
# Display all metadata
dmsp.meta.data

# Display ion temperature metadata
dmsp.meta['ti']

# Retrieve units using standard labels
dmsp.meta['ti'].units

# Retrieve units using general labels
dmsp.meta['ti', dmsp.meta.labels.units]

# Update units for ion temperature using direct assignment
dmsp.meta['ti', dmsp.meta.labels.units] = 'Kelvin'

# Update display name for ion temp, using dict assignment and LaTeX notation
dmsp.meta['ti'] = {dmsp.meta.labels.name: 'T$_i$'}

# Add new meta data for multiple labels using dict assignment
dmsp.meta['new'] = {dmsp.meta.labels.units: 'unitless',
                    dmsp.meta.labels.name: 'New display name'}
The string values used within pysat.Meta to identify the parameters
above are all attached to the pysat.Instrument object through a
label assigned by the MetaLabels class. They can be acceess as
dmsp.meta.labels.* (labels.units,
labels.min_val, labels.notes, etc).
All variables must have the same metadata parameter labels. If a new parameter is added for only one data variable, then the remaining data variables will get a null value for that metadata parameter.
Data values may be assigned to the Instrument, with or without
Meta data.
# Assign data alone
dmsp['new_data'] = new_data

# Assign data with metadata.
# The data must be keyed under 'data' and all other
# dictionary inputs are presumed to be metadata
dmsp['new_data'] = {'data': new_data,
                    dmsp.meta.labels.units: new_unit,
                    'new_meta_data': new_value}

# Alter assigned metadata
dmsp.meta['new_data', 'new_meta_data'] = even_newer_value
The labels used for identifying metadata may be provided by the user at
Instrument instantiation and do not need to conform with what is in
the file.
dmsp = pysat.Instrument(platform='dmsp', name='ivm', tag='utd',
                        inst_id='f12', clean_level='dirty',
                        labels={'units': 'new_units'})
dmsp.load(2001, 1)
dmsp.meta['ti', 'new_units']
dmsp.meta['ti', dmsp.meta.labels.units]
While this feature doesn’t require explicit support on the part of an instrument
module developer, code that does not use MetaLabels through the
labels attribute may not always work when a user invokes this
functionality.
The pysat.Meta object is case insensitive but case preserving. Thus,
if a particular Instrument uses units for the
pysat.MetaLabels.units name, but if a separate pysat package uses
Units or UNITS, the code will still function as intended.
# the following are all equivalent
dmsp.meta['TI', 'Long_Name']
dmsp.meta['Ti', 'long_Name']
dmsp.meta['ti', 'Long_NAME']
Note
While Meta access is case-insensitive, data
access is case-sensitive.
Global metadata, which is consistent across all data variables for an instrument
are stored in the Meta.header attribute. This attribute is a
pysat.MetaHeader object that may store useful information such as
the instrument PI, etc. Previous versions of pysat stored this data as custom
attributes attached to the pysat.Instrument, instead of keeping all
metadata in the pysat.Meta object.
Global metadata is loaded into the pysat.MetaHeader by default, but
to avoid breaking existing workflows, loading this metadata directly into the
Instrument by setting the use_header
keyword argument.
# This will raise a warning that future releases will require use of
# the MetaHeader class
dmsp.load(date=start, use_header=False)
You can manually add global metadata the same way you would assign an attribute. This can be useful for tracking analysis steps.
dmsp.meta.header.downselect = "Data have been limited to +/- 5 degrees"
All global metadata can be retrieved as a dict using the
to_dict() method.
# This will show: {'downselect': 'Data have been limited to +/- 5 degrees'}
head_dict = dmsp.meta.header.to_dict()
print(head_dict)